
Writing a Raydium sniper in Rust part 3
This is part three of this series, where we are creating a Solana sniper bot for Raydium from scratch in Rust. See the first post here which includes an introduction about why we use a compiled language instead of JavaScript, as well as prerequisites and a brief introduction about me. You can find the latest GitHub source here, which will be updated with each new post.
Disclaimer
The information provided in this series of articles is for educational purposes only and should not be considered financial or investment advice. Trading, including sniping tokens, carries significant risks, and there is no guarantee of profit.
Any decisions you make based on the content shared here are solely your responsibility. I am not liable for any financial losses incurred as a result of implementing the strategies, code, or techniques discussed in these articles.
Always trade responsibly. Never risk more money than you can afford to lose. It is essential to conduct your own research and consult with a professional financial advisor if necessary before engaging in any trading activities.
What to expect today
Last time, we implemented a websocket watcher that monitors any Raydium `initialize2 transactions. These transactions occur when a new token is minted, making them suitable for sniping.
Today, we will explore swap transactions, initialize transactions, and how to extract the information necessary for sniping a token.
Apologies for the lengthy explanation — I know you’re eager to dive into the code. Don’t worry; we’ll get to it later in the article. However, understanding the concepts outlined below is a crucial part of building a sniper.
Sure, you can copy-paste the code I provide in the GitHub repo, but the moment something unexpected happens, you probably won’t have a clue how to recover from it.
Transactions
Now, let’s start digging into transactions and get a brief overview of how smart contracts work.
As you read this, you are probably familiar with sites such as Dexscreener, which monitors on-chain activity. The image below is from Dexscreener, where we will analyze a swap transaction.
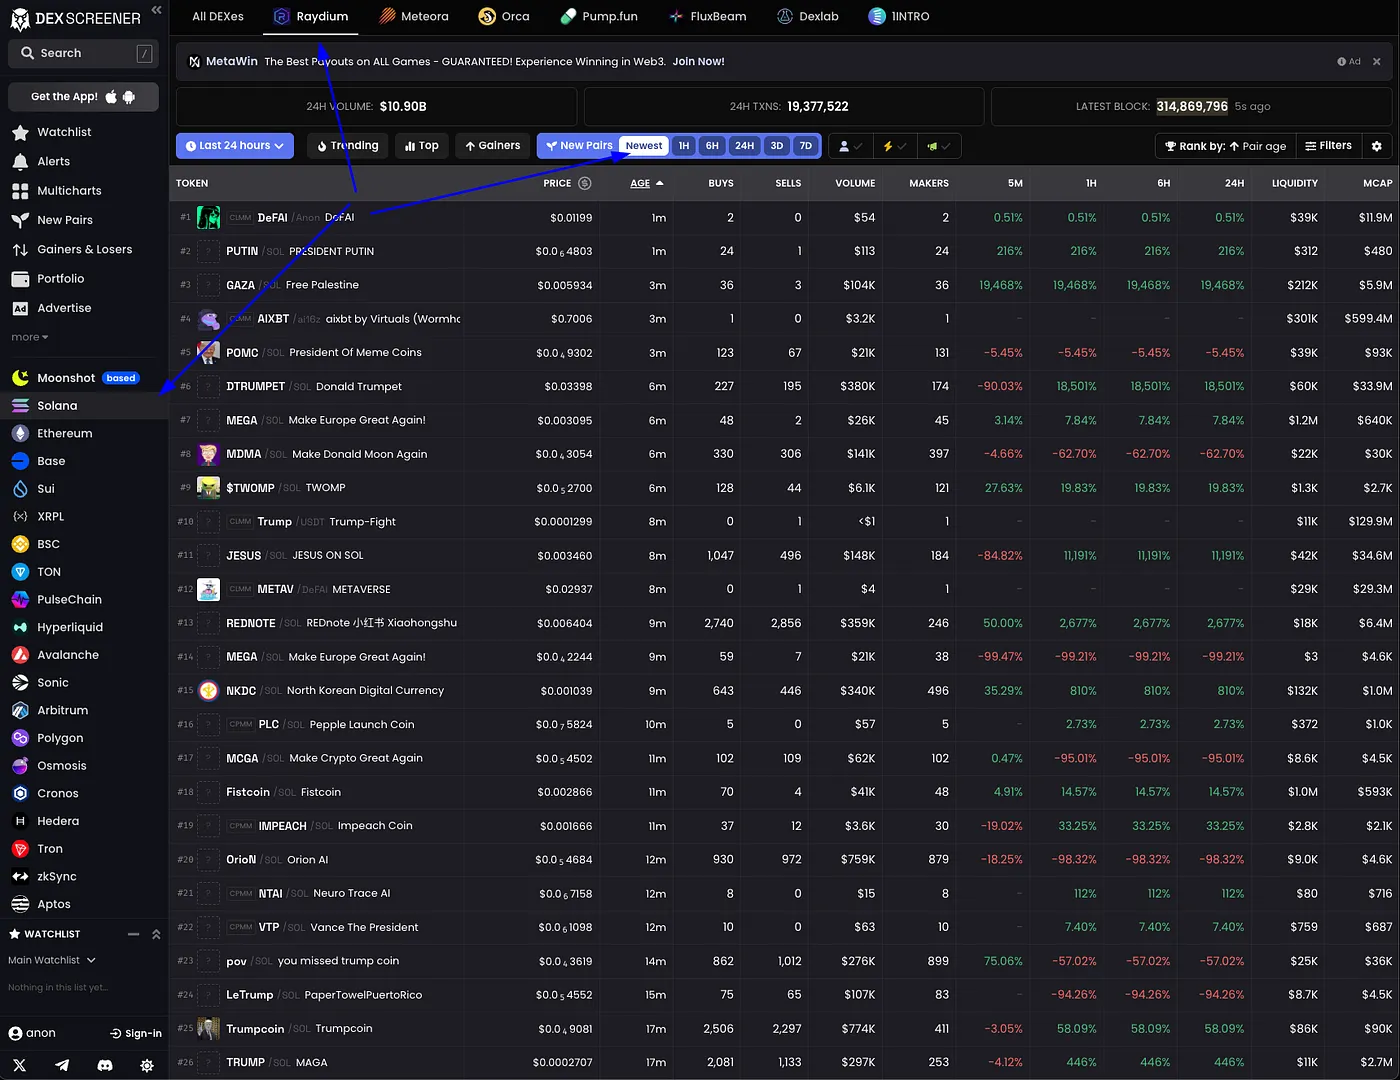
Dexscreener with arrows marking how to see latest meme coins in Raydium
I have added a few arrows to demonstrate how I locate the latest Raydium tokens.
For example I have chosen the A/SOL token, just a random token:
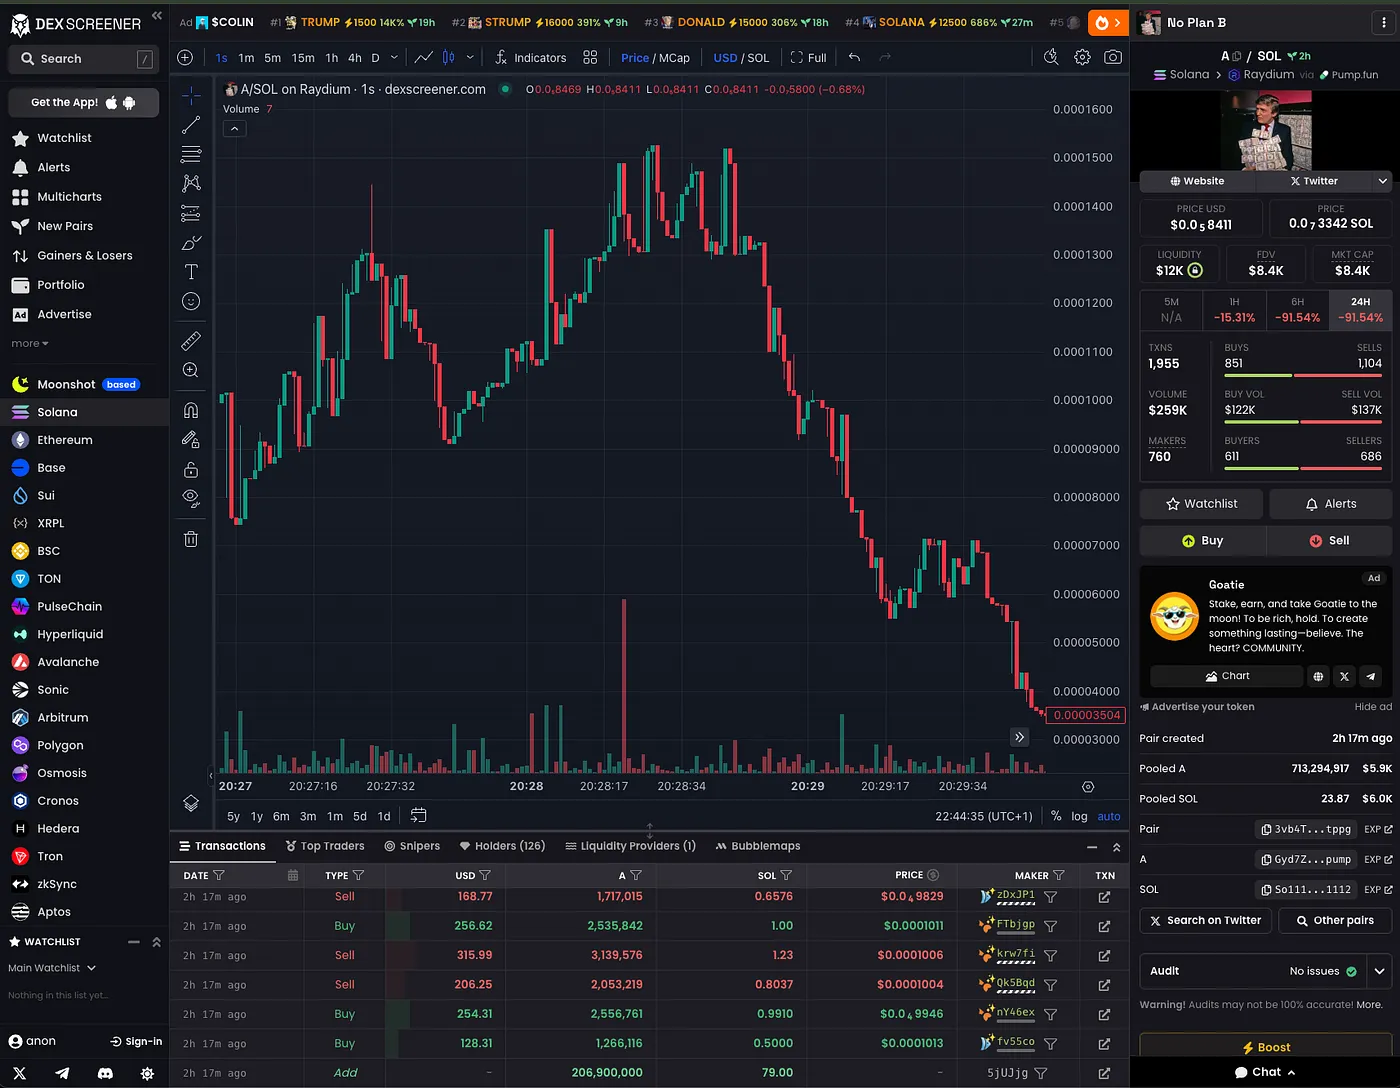
Dexscreener A/SOL token graph
A lot is happening here, so let’s list the most obvious points:
- The market is crazy volatile
- The first record shows 79 SOL added as liquidity.
- The second and third transactions are swaps where the token was bought the moment it hit the market.
- The fourth and fifth transactions seem unusual.
Two users are selling their A tokens, but they are not the same individuals who bought in transactions two and three. What might be happening here?
The market is extremely volatile, and this behavior is best described as a game. For ~99% of all fresh tokens, it’s a quick in-and-out process, as these tokens typically crash within 2 to 20 minutes of launch.
To understand what’s happening here, you need to be aware of something called pump.fun. The A/SOL token was not originally launched on Raydium — it was relaunched there. Raydium allows anyone to create a new token, and if a token gains enough traction, it is relaunched on Raydium. This relaunch uses liquidity generated during the pump.fun phase, which occurs when the bonding curve reaches 100%.
There’s much more to learn about this process, but for sniping tokens on Raydium, the specifics of pump.fun are not particularly relevant. I encourage users to explore pump.fun in more depth if they wish to fully understand the entire lifecycle of a token.
Breaking down swap transactions
Back to transaction two and three, lets see whats happening there:
Lets take transaction two, and break it down into bits, for a deeper understand of whats going on.
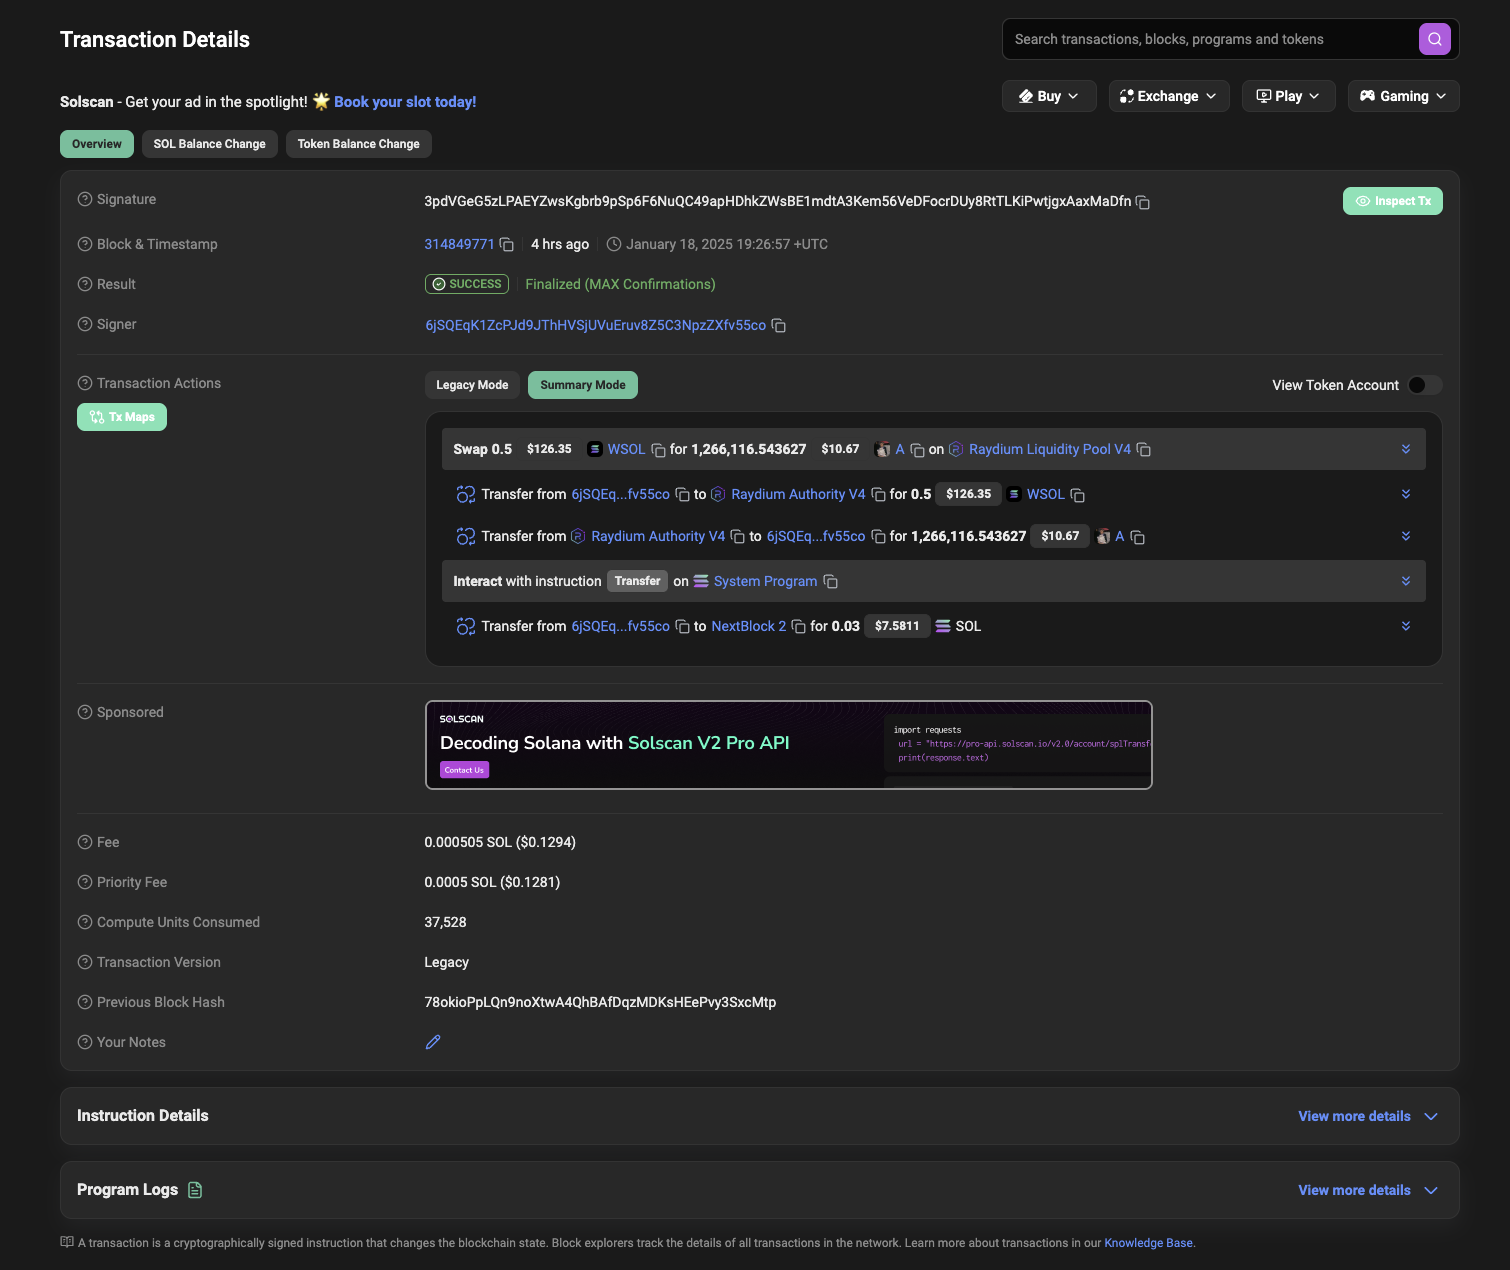
Solana Raydium swap transaction
Note: The following might bore the average reader, but understanding the basics of Solana transactions is crucial and the bare minimum for both developing and maintaining a sniper bot. Apart from the points below, every eager sniper developer should thoroughly read Solana’s documentation from start to finish, at least once.
Result
The result covers both the stages and the result itself (Failed/Finalized). We touched on this concept in the previous post, where we discussed the stages: Processed, Confirmed, and Finalized.
Signer
A signer is the public key associated with your wallet. If you perform a swap transaction through any platform, your public key serves as the signer.
There are also cases where smart contracts act as signers. For example, when a token on pump.fun reaches the bonding curve threshold and gets relaunched on Raydium, it is actually a smart contract that signs and moves the funds. This happens because a specific condition has been met.
Fee
The fee you choose to pay for a transaction is based on the number of compute units consumed. When performing swaps, you will specify a maximum compute unit limit.
I encourage you to read the Solana Docs, especially the core sections, as they contain vital information. For example, the lower the compute unit limit you set, the higher the chance your transaction will be processed faster than those with a higher limit. This is because transactions with higher limits might not fit into the current block being proposed.
This is critical information for sniping, as it means we should aim to set the smallest possible compute unit limit. However, it’s important not to make it too small, as that would void the transaction. Validators need enough compute units to execute the smart contract and handle the overall instructions in the transaction.
Priority Fee
This is a fee you can set to increase the chances of your transaction being picked sooner, essentially by tipping your friendly validator. Set it about 5% above the market average. Anything higher is just wasting money, as the effect tends to flatline around 5% to 8%, at least according to my test cases.
Compute Units Consumed
This is the actual number of compute units consumed by your transaction. Note that there is a limit to how high you can set the compute unit limit: 1.4 million per transaction and 200,000 per instruction. We won’t be working anywhere near those numbers, but anything above those limits will result in an error.
Swap instruction
Now lets dig into the swap instruction:
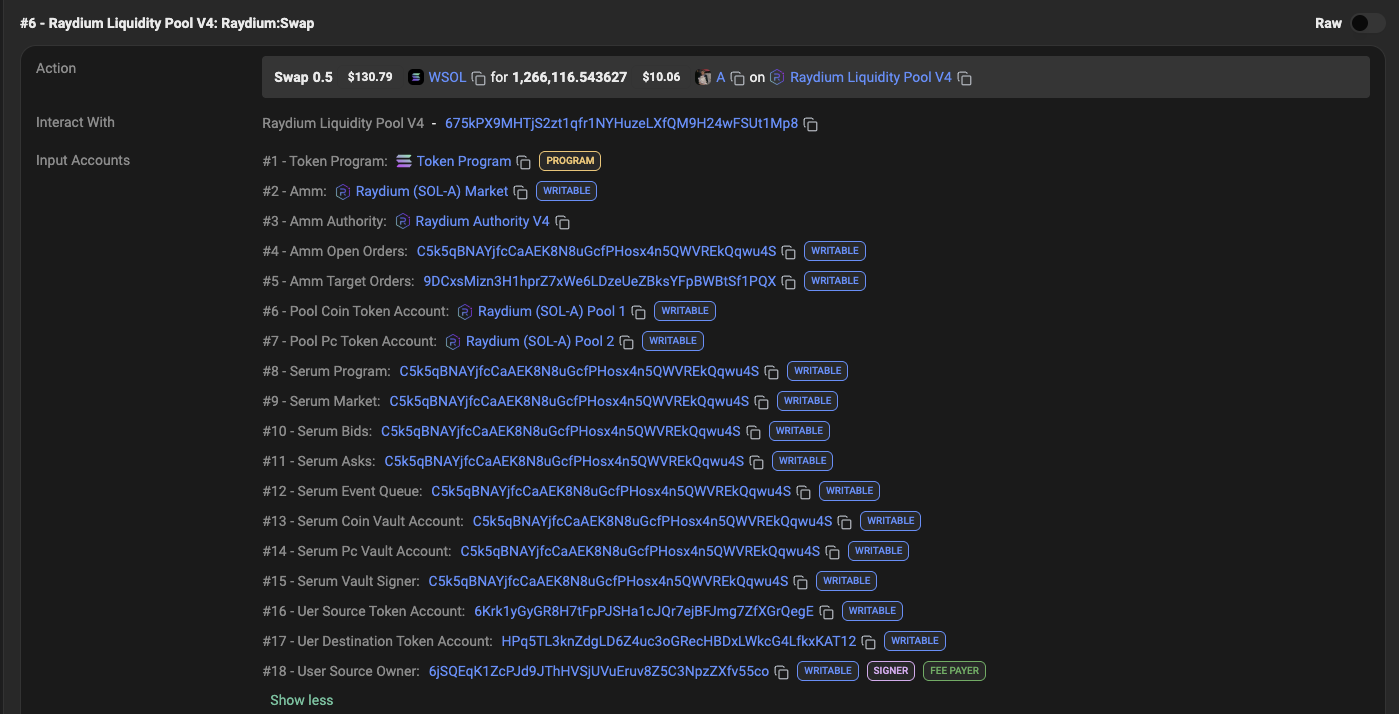
Solana Raydium swap transaction
Note i skipped a lot of instructions such as creating Account with seed, initialize Account, transfers and so on, majority of these will be covered when we learn how to wrap sol. Instead we will focus on
#6 - Raydium Liquidity Pool V4: raydium:swap
The source code to the smart contract can be found here:
https://github.com/raydium-io/raydium-amm/tree/master
A Solana smart contract is an on-chain program written in Rust, (Less common C, or C++) that executes specific logic based on predefined rules. They are stateless and handle only the logic, while the data is managed through accounts.
In other words, accounts and an instruction go in, the smart contract works behind the scenes, and in our case — voilà! — we’ve made a swap of a brand-new token released only seconds ago.
Now, let’s break the swap transaction into chunks:
- Input Account 1
This is simply the Solana token program, which is used to create most new tokens. Regarding meme coins, I’ve never seen any other program used, so it’s safe to say this is always static. - Input Accounts 2–7
These are Raydium-specific accounts. I encourage readers to read up on and understand what each account does. For the purpose of swapping, we just need to know these accounts exist and match them, as the smart contract handles all the heavy lifting. - Input Accounts 10–15
These represent the order books, essentially detailing the inflow and outflow. One such order book could be Openbook. - Accounts 8 and 9
Are particularly important, while the rest are PDA (Program Derived Addresses), which can be quickly derived. - Input Accounts 16–18
These are our accounts: -
- #16: The token account we’re using to input funds for buying A/SOL.
-
- #17: The address where we will receive the A tokens.
-
- #18: Our public key, which identifies our wallet.
Our wallet’s private key holds authority over both #16 and #17.
Solana A/SOl swap transaction input
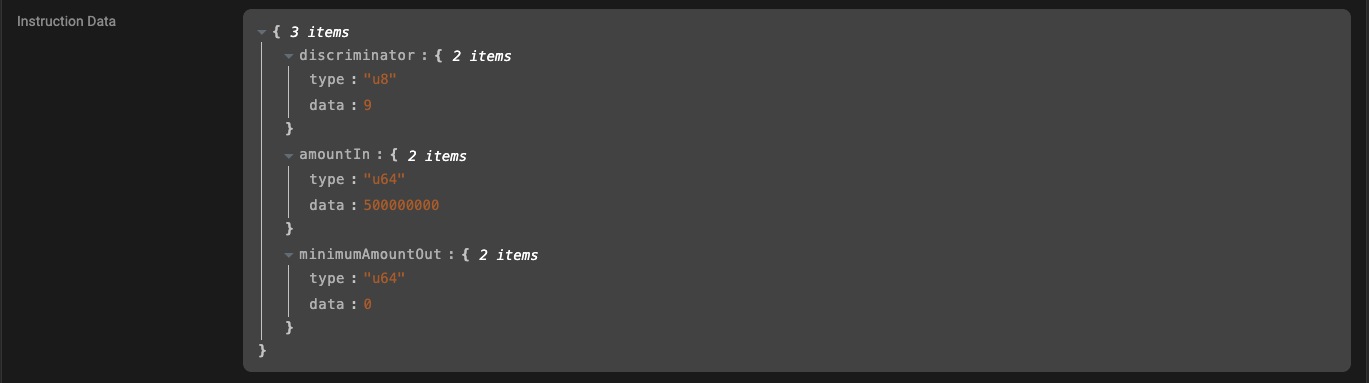
The smart contract processes specific inputs to execute the swap:
- Discriminator: This determines which part of the program to run. In this case, the number 9 is input to trigger a swap. If we input 7, the swap wouldn’t occur. To understand what would happen, you could analyze the smart contact source code
- amountIn: The amount of the payment token we are providing.
- minimumAmountOut: This translates to our slippage tolerance. We can take the lazy route and set it to 0, essentially allowing any slippage. Alternatively, we can calculate the expected output and set this value to be 5% lower, effectively allowing a 5% slippage.
Initialize2 transaction
Now let’s take a look at the initialize2 transaction for A to see what information we can extract for our swap instruction and what we still need.
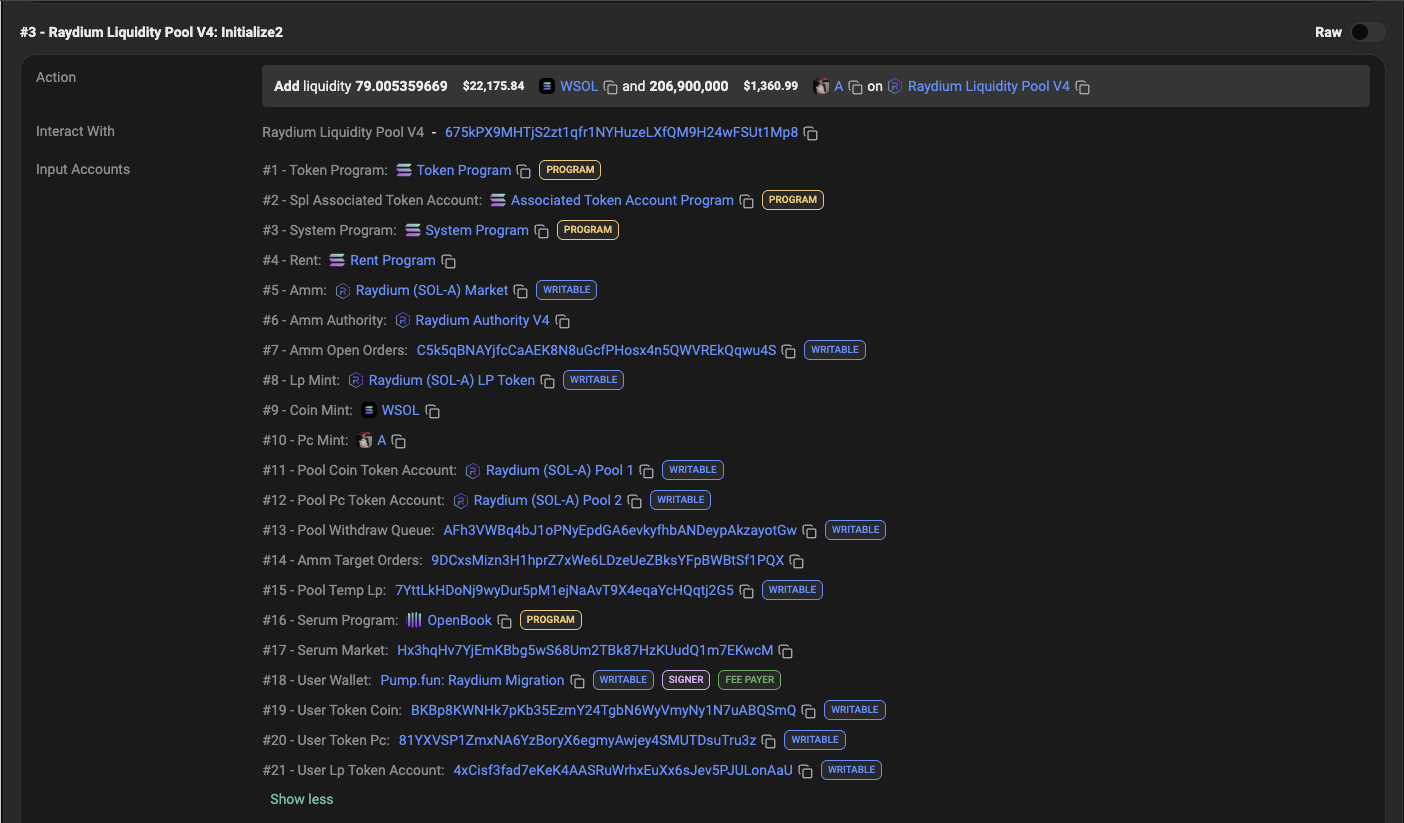
Solana A/SOl Initialize2 instruction
Does that look familiar? It should! Here’s a breakdown of the input accounts:
- Input Accounts 5–8 + 11–14: These correspond to the Raydium AMM accounts.
- Input Accounts 9 + 10: These represent the input token and output token (e.g., SOL and A).
- Input Accounts 16–17: These correspond to the Serum program and market. That’s all we need to execute a swap. Yay!
Lets get coding
Last time, we obtained the signature for the initialize2 transactions from our WebSocket stream. Now, after that long (but crucial!) schooling session of text, let’s use RPC to fetch the transaction and parse the accounts.
First, let’s update utils/Cargo.toml with the latest requirements for nonblocking RPC, public key handling, and Solana's built-in transaction structures and implementations. Add the following dependencies to your project:
solana-transaction-statussolana-clientsolana-sdktokio
[dependencies]
dotenv = { workspace = true }
thiserror = { workspace = true }
solana-transaction-status = { workspace = true}
solana-client = { workspace = true }
solana-program = { workspace = true }
solana-sdk = { workspace = true }
env_logger = { workspace = true }
log = { workspace = true }
tokio = { workspace = true }
Create the file utils/src/raydium/initialize2.rs and add the following content
use solana_sdk::pubkey;
use solana_sdk::pubkey::Pubkey;
use solana_sdk::transaction::VersionedTransaction;
use std::fmt;
use log::info;
use solana_client::nonblocking::rpc_client::RpcClient;
use solana_client::rpc_config::RpcTransactionConfig;
use solana_sdk::commitment_config::CommitmentConfig;
use solana_sdk::signature::Signature;
use solana_transaction_status::UiTransactionEncoding;

pub struct RaydiumInitialize2Transaction {
    token_program: Pubkey,
    spl_associated_token_account: Pubkey,
    system_program: Pubkey,
    rent_program: Pubkey,
    amm: Pubkey,
    amm_authority: Pubkey,
    amm_open_orders: Pubkey,
    lp_mint: Pubkey,
    coin_mint: Pubkey,
    pc_mint: Pubkey,
    pool_coin_token_account: Pubkey,
    pool_pc_token_account: Pubkey,
    pool_withdraw_queue: Pubkey,
    amm_target_orders: Pubkey,
    pool_temp_lp: Pubkey,
    serum_program: Pubkey,
    serum_market: Pubkey,
    user_wallet: Pubkey,
    user_token_coin: Pubkey,
    user_token_pc: Pubkey,
    user_lp_token_account: Pubkey,
}

#[derive(Debug)]
pub enum RaydiumTransactionError {
    NotEnoughKeys,
    CantFindTokenAddress,
    NoTransactionFound,
    CouldNotParseTransaction,
}

impl RaydiumInitialize2Transaction {

    pub async fn get_transaction(tx: Signature, rpc_endpoint: String) -> Result<RaydiumInitialize2Transaction, RaydiumTransactionError> {
        let client =
            RpcClient::new_with_commitment(rpc_endpoint, CommitmentConfig::processed());

        let config = RpcTransactionConfig {
            encoding: Some(UiTransactionEncoding::Binary),
            commitment: Some(CommitmentConfig::confirmed()),
            max_supported_transaction_version: Some(2),
        };
        let transaction = client
            .get_transaction_with_config(&tx, config)
            .await
            .map_err(|_| RaydiumTransactionError::NoTransactionFound)?;

        if let Some(versioned_transaction) = transaction.transaction.transaction.decode() {
            return RaydiumInitialize2Transaction::parse(&versioned_transaction)
        }

        Err(RaydiumTransactionError::CouldNotParseTransaction)
    }
    pub fn parse(transaction: &VersionedTransaction) -> Result<Self, RaydiumTransactionError> {
        let keys = transaction.message.static_account_keys();
        if keys.len() != 22 {
            return Err(RaydiumTransactionError::NotEnoughKeys);
        }

        // Use to debug the order of the keys inputted, if something seems off
        /* for (index, solana_address) in keys.iter().enumerate() {
            debug!("{}: {}", index, solana_address);
        } */

        /* eval token addresses */
        let base_coin;
        let token_coin;

        if keys[13].to_string() == "So11111111111111111111111111111111111111112" {
            base_coin = pubkey!("So11111111111111111111111111111111111111112");
            token_coin = keys[18];
        } else if keys[18].to_string() == "So111111111111111111111111111111111111111111" {
            base_coin = pubkey!("So11111111111111111111111111111111111111112");
            token_coin = keys[13];
        } else {
            return Err(RaydiumTransactionError::CantFindTokenAddress);
        }

        Ok(RaydiumInitialize2Transaction {
            token_program: keys[12],
            spl_associated_token_account: keys[16],
            system_program: keys[11],
            rent_program: keys[14],
            amm: keys[2],
            amm_authority: keys[17],
            amm_open_orders: keys[3],
            lp_mint: keys[4],
            coin_mint: base_coin,
            pc_mint: token_coin,
            pool_coin_token_account: keys[5],
            pool_pc_token_account: keys[6],
            pool_withdraw_queue: keys[7],
            amm_target_orders: keys[19],
            pool_temp_lp: keys[8],
            serum_program: keys[20],
            serum_market: keys[21],
            user_wallet: keys[0],
            user_token_coin: keys[1],
            user_token_pc: keys[9],
            user_lp_token_account: keys[10],
        })
    }

    pub fn get_mint(&self) -> Pubkey {
        self.pc_mint
    }
}

impl fmt::Display for RaydiumInitialize2Transaction {
    fn fmt(&self, f: &mut fmt::Formatter<'_>) -> fmt::Result {
        write!(
            f,
            "token_program:                {}
spl_associated_token_account: {}
system_program:               {}
rent_program:                 {}
amm:                          {}
amm_authority:                {}
amm_open_orders:              {}
lp_mint:                      {}
coin_mint:                    {}
pc_mint:                      {}
pool_coin_token_account:      {}
pool_pc_token_account:        {}
pool_withdraw_queue:          {}
amm_target_orders:            {}
pool_temp_lp:                 {}
serum_program:                {}
serum_market:                 {}
user_wallet:                  {}
user_token_coin:              {}
user_token_pc:                {}
user_lp_token_account:        {}",
            self.token_program,
            self.spl_associated_token_account,
            self.system_program,
            self.rent_program,
            self.amm,
            self.amm_authority,
            self.amm_open_orders,
            self.lp_mint,
            self.coin_mint,
            self.pc_mint,
            self.pool_coin_token_account,
            self.pool_pc_token_account,
            self.pool_withdraw_queue,
            self.amm_target_orders,
            self.pool_temp_lp,
            self.serum_program,
            self.serum_market,
            self.user_wallet,
            self.user_token_coin,
            self.user_token_pc,
            self.user_lp_token_account
        )
    }
}
Whew, that’s a lot of code! Let’s break it down into chunks to thoroughly understand each part.
pub struct RaydiumInitialize2Transaction {
    token_program: Pubkey,
    spl_associated_token_account: Pubkey,
    system_program: Pubkey,
    rent_program: Pubkey,
    amm: Pubkey,
    amm_authority: Pubkey,
    amm_open_orders: Pubkey,
    lp_mint: Pubkey,
    coin_mint: Pubkey,
    pc_mint: Pubkey,
    pool_coin_token_account: Pubkey,
    pool_pc_token_account: Pubkey,
    pool_withdraw_queue: Pubkey,
    amm_target_orders: Pubkey,
    pool_temp_lp: Pubkey,
    serum_program: Pubkey,
    serum_market: Pubkey,
    user_wallet: Pubkey,
    user_token_coin: Pubkey,
    user_token_pc: Pubkey,
    user_lp_token_account: Pubkey,
}
We create a new struct to hold the accounts in the Initialize2 transaction. Not all accounts are necessary for swapping, but if you want to expand the functionality later, the user_wallet could be important for features like copy trading. The same goes for the standard programs used. I’ve included them here to provide easier flexibility for future development.
After that we implement two new functions for our struct get_transaction, and parse,
get_transaction
pub async fn get_transaction(tx: Signature, rpc_endpoint: String) -> Result<RaydiumInitialize2Transaction, RaydiumTransactionError> {
    let client =
        RpcClient::new_with_commitment(rpc_endpoint, CommitmentConfig::processed());

    let config = RpcTransactionConfig {
        encoding: Some(UiTransactionEncoding::Binary),
        commitment: Some(CommitmentConfig::processed()),
        max_supported_transaction_version: Some(2),
    };
    let transaction = client
        .get_transaction_with_config(&tx, config)
        .await
        .map_err(|_| RaydiumTransactionError::NoTransactionFound)?;

    if let Some(versioned_transaction) = transaction.transaction.transaction.decode() {
        return RaydiumInitialize2Transaction::parse(&versioned_transaction)
    }

    Err(RaydiumTransactionError::CouldNotParseTransaction)
}
We use Solana’s RpcClient, specifically the non-blocking version. This is crucial because, later on, we will delve deeper into async behavior to decouple certain processes and distribute them across multiple CPU cores.
Next, we create an RpcTransactionConfig, where we request binary encoding and a processed commitment. If we successfully find the transaction, we retrieve it using client.get_transaction_with_config. If the transaction is not found, the function will simply halt and return control back to the WebSocket stream, which will continue looking for new initialize2 transactions.
Finally, we decode the transaction into a versioned_transaction and pass it to our parse function.
Parse
pub fn parse(transaction: &VersionedTransaction) -> Result<Self, RaydiumTransactionError> {
    let keys = transaction.message.static_account_keys();
    if keys.len() != 22 {
        return Err(RaydiumTransactionError::NotEnoughKeys);
    }

    // Use to debug the order of the keys inputted, if something seems off
    /* for (index, solana_address) in keys.iter().enumerate() {
        debug!("{}: {}", index, solana_address);
    } */

    /* eval token addresses */
    let base_coin;
    let token_coin;
    if keys[13].to_string() == "So11111111111111111111111111111111111111112" {
        base_coin = pubkey!("So11111111111111111111111111111111111111112");
        token_coin = keys[18];
    } else if keys[18].to_string() == "So111111111111111111111111111111111111111111" {
        base_coin = pubkey!("So11111111111111111111111111111111111111112");
        token_coin = keys[13];
    } else {
        return Err(RaydiumTransactionError::CantFindTokenAddress);
    }

    Ok(RaydiumInitialize2Transaction {
        token_program: keys[12],
        spl_associated_token_account: keys[16],
        system_program: keys[11],
        rent_program: keys[14],
        amm: keys[2],
        amm_authority: keys[17],
        amm_open_orders: keys[3],
        lp_mint: keys[4],
        coin_mint: base_coin,
        pc_mint: token_coin,
        pool_coin_token_account: keys[5],
        pool_pc_token_account: keys[6],
        pool_withdraw_queue: keys[7],
        amm_target_orders: keys[19],
        pool_temp_lp: keys[8],
        serum_program: keys[20],
        serum_market: keys[21],
        user_wallet: keys[0],
        user_token_coin: keys[1],
        user_token_pc: keys[9],
        user_lp_token_account: keys[10],
    })
}
We extract the accounts from the transaction and verify that it contains exactly 22 accounts. We also check that an SPL token, such as WSOL, is used. There are different ways to create a token on Raydium, so we perform minimal validation to ensure the input matches the expected format. While more extensive validation could (and probably should) be implemented, every millisecond counts, so we keep it minimal—especially since this is a core route from discovering to sniping a token.Finally we also implement fmt::Display, this is simply to control the output when we print or log our initialize2 struct.
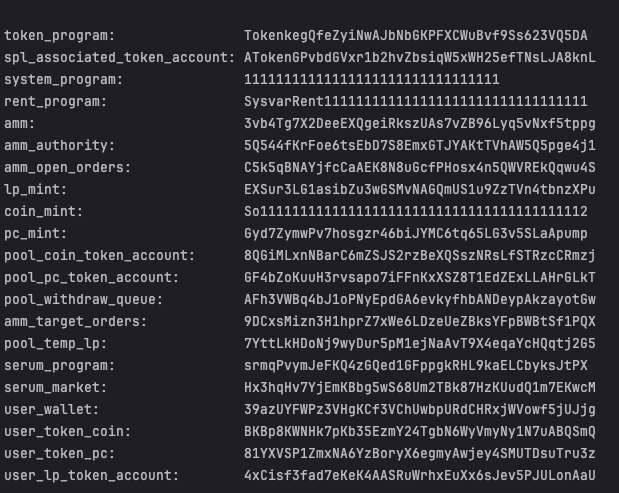
CLI output of token addresses
Create the file utils/src/raydium/mod.rs with the below line
Add the new module raydium to utils/src/lib.rs
Let’s update the start_thread function in sniper/src/oracle/websocket.rs to use the new transaction parser. We will modify the function as follows:
pub async fn start_thread(&self) {
        info!("Starting Solana websocket subscriber");
        let subscribe_to = self.subscribe_to.clone();
        let config_level = self.config_level.clone();
        let rpc_endpoint = self.rpc_endpoint.clone();
        let (mut stream, _) = self.client.logs_subscribe(
            RpcTransactionLogsFilter::Mentions(
                subscribe_to
            ),
            RpcTransactionLogsConfig {
                commitment: Some(config_level),
            }
        ).await.expect("Failed to subscribe to Logs!");

        info!("Waiting for next event");
        while let Some(response) = stream.next().await {

            for log in &response.value.logs {
                /* skip all events that does not contain initialize2 eg token create */
                if !log.contains("initialize2") {
                    continue
                }
                {
                    let tx = Signature::from_str(response.value.signature.as_str()).unwrap();
                    info!("Received tx https://solscan.io/tx/{}", tx);
                    let transaction = RaydiumInitialize2Transaction::get_transaction(tx, rpc_endpoint.clone()).await;

                    if transaction.is_err() {
                        info!("Failed to get transaction");
                    } else {
                        let initialize2_transaction = transaction.unwrap();
                        info!("====={}=====\r\n{}", initialize2_transaction.get_mint(), initialize2_transaction);
                    }
                }
            }
        }
Notice the
let transaction = RaydiumInitialize2Transaction::get_transaction(tx, rpc_endpoint.clone()).await;

if transaction.is_err() {
    info!("Failed to get transaction");
} else {
    let initialize2_transaction = transaction.unwrap();
    info!("====={}=====\r\n{}", initialize2_transaction.get_mint(), initialize2_transaction);
}
Here, we simply call our new get_transaction method. If the transaction is ready, we print it to ensure that we have everything needed for the swap transaction.
Update sniper/Cargo.toml with solana-sdk and solana-transaction-status dependencies
[...]
[dependencies]
utils = { workspace = true }
solana-client = { workspace = true }
solana-sdk = { workspace = true}
tokio = { workspace = true }
futures = { workspace = true }
log = { workspace = true }
Thats it, lets take it for at test run!
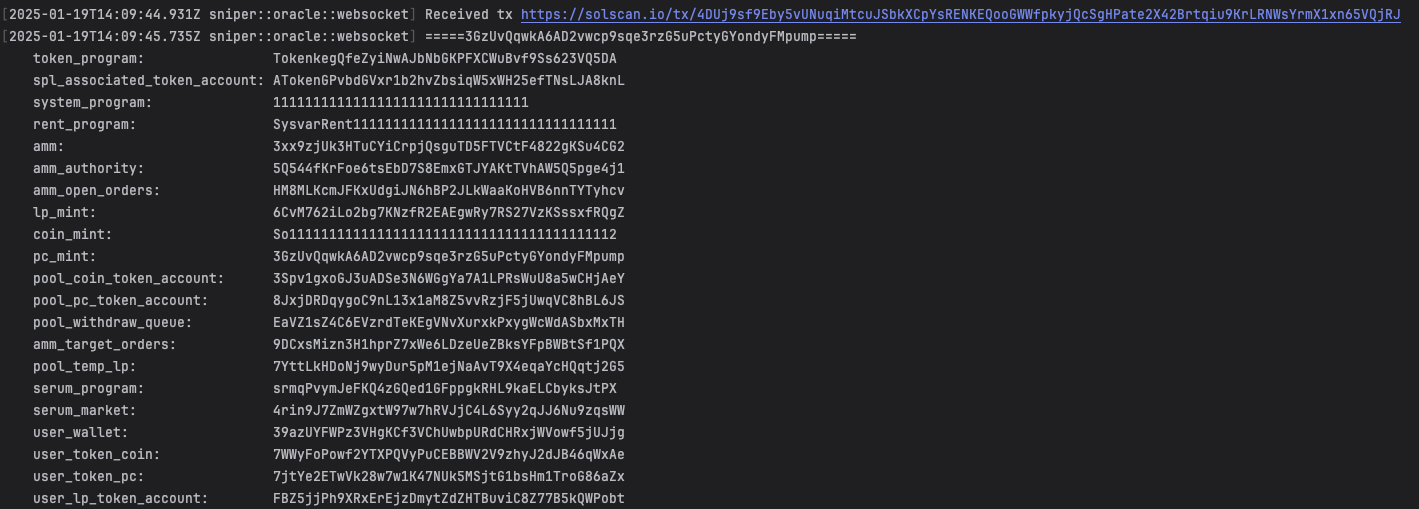
CLI output of token addresses with ms timings
Stability
Is the current method stable? Not quite. We use “Processed” in both the WebSocket stream and RPC transaction fetch, but the RPC often lags behind the WebSocket stream, causing the program to fail. There are several ways to mitigate this, though none are covered in this article. You could set the commitment status to “Confirmed” and discover it a second later, or retry for a few seconds before aborting.
Up next
In the next article, we will look into how to change our SOL to WSOL, which is needed for swapping, we will do this with a command line layer.