
Writing a Solana Raydium sniper in Rust
If sniping positions are important to you, Rust or any compiled language is essential for peeling off every possible millisecond. This stands in contrast to the more traditional sniping language, JavaScript, which is interpreted and therefore inherently slower than a compiled language.
This is a story about how I discovered sites like Dexscreener, stayed up all night trying to turn a profit on those impressive +10,000% gain tokens through manual trades, and eventually ended up coding my own sniper. Starting with Python and later transitioning to Rust, I was able to consistently rank among the top 10 snipes for any new AMM token on Raydium.
What to expect
This series of articles will be released as I find time to write them. After each release, I will update the associated GitHub repository here, with the latest code. This also means, the sniper will be released in small chunks.
So, when will it all be available? Honestly, I don’t know yet. Ideas often evolve over time, and while I already have the final code in a private repository, I might come up with improvements or ways to make it more user-friendly as this series progresses.
I’m not a Rust expert, I’ve only been working with the language for a little over six months. I initially learned Rust with the goal of building my Solana sniper bot. Since then, I’ve developed a passion for the language and have started using it for various other projects.
About me
By now, you might be wondering about my experience as a programmer, so here’s a brief (and maybe slightly boring) overview. 😉
I am a Senior DevOps Engineer in my early thirties. I started with Linux hosting at the age of 15 and, by 25, had freelanced for over 80 companies across Denmark, Norway, and the USA, specializing in e-commerce and operations. Today, I work full-time as a Senior DevOps Engineer, contributing to some of Denmark’s largest e-commerce ventures. My responsibilities include serving as a tech lead on large projects, mentoring new developers, and managing operations and security for over 100 dedicated servers and numerous cloud instances.
In 2024, I became captivated by the world of crypto and quickly immersed myself in quantitative trading. I turned a profit using strategies like RSI, Top and Bottom patterns, Harmonic patterns, and more. Midway through 2024, I delved deeper into blockchain technologies. When I discovered DexScreener with its incredible +10,000% gains, I was determined to compete with the veterans and snipe faster than anyone else. Three months later, I succeeded in consistently ranking among the top 10, and often the top 5, in snipes.
This article will chronicle my amazing adventure and the lessons I learned along the way.
Prerequisites
To follow along with this series, you should have some experience in Rust or at least a few years of programming experience in any language. The explanations will assume familiarity with basic programming concepts, as well as the ability to compile and use Rust programs.
If you have suggestions for improvements, feel free to reach out to me at https://t.me/weestack.
Disclaimer
The information provided in this series of articles is for educational purposes only and should not be considered financial or investment advice. Trading, including sniping tokens, carries significant risks, and there is no guarantee of profit.
Any decisions you make based on the content shared here are solely your responsibility. I am not liable for any financial losses incurred as a result of implementing the strategies, code, or techniques discussed in these articles.
Always trade responsibly. Never risk more money than you can afford to lose. It is essential to conduct your own research and consult with a professional financial advisor if necessary before engaging in any trading activities.
Getting our hands dirty
Creating the base structure
For those familiar with Rust, we’re not just creating a single binary. Instead, we’ll be building multiple binaries along with a shared library that connects them. I chose this structure for its flexibility and ease of use. In my case, it allowed me to manage a command suite, sniper, algorithmic trader, and a shared library, all working seamlessly together. This modular approach makes it easier to maintain and expand the project in the future.
Adding the root Cargo.toml
[workspace]
resolver = "2"
members = [
    "sniper"
]

[workspace.package]
name = "Solana-Sniper"
authors = ["Alexander Høgh"]
edition = "2021"
homepage = ""
repository = "https://github.com/weestack/Solana-Sniper"
license = "MIT"
keywords = ["solana", "sniper", "wsol"]
version = "0.1.0"
readme = "README.md"
categories = ["science", "algorithms"]
publish = false

[workspace.lints.clippy]
clone_on_ref_ptr = "deny"
missing_const_for_fn = "deny"
trivially_copy_pass_by_ref = "deny"

[profile.release]
lto = true
codegen-units = 1
In the Cargo.toml, we will define all the required dependencies. These dependencies will be inherited on a per-need basis in the different binaries, ensuring each component only includes the necessary libraries and modules for optimal performance and maintainability.
You should now have a project that matches structure in the image below(Minus the .gitignore, LICENSE and README.md)
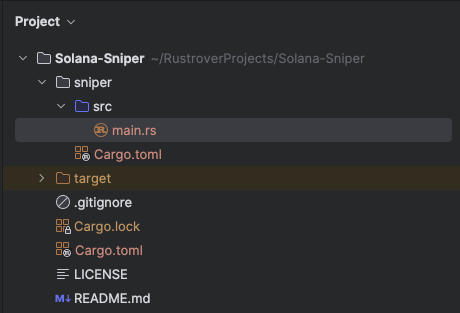
Our worktree after cargo new sniper
Accepting variables from a .env file
The first step is to create a secure and convenient way to store important variables for our sniper, such as paid RPC and WSS connections, private keys, snipe amounts, fee amounts, and other data. For security reasons, we should avoid adding this information to Git. This will be handled in the shared library mentioned earlier.
Creating files for our library
cargo new --lib utils
sed -i -e 's/name.workspace = true/name = "utils"/g' utils/Cargo.toml
mkdir -p utils/src/env
touch utils/src/env/mod.rs
touch utils/src/env/env.rs
touch utils/src/env/errors.rs
Using the above steps, we create a new library package, rename it to “utils,” and add a folder named env. Inside the folder, we include mod.rs, env.rs, and errors.rs files.
Before proceeding with any coding, add the following dependencies to the respective Cargo.toml files to ensure everything is set up.
root Cargo.toml
Inside the root folders Cargo.toml, make these updates
#Cargo.toml (root Cargo.toml)
[...]
[workspace.dependencies]
utils = { path = "utils" }
dotenv = "0.15.0"
thiserror = "2.0.9"
solana-client = "2.1.7"
solana-program = "2.1.7"
solana-sdk = "2.1.7"
tokio = "1.42.0"
[...]


#sniper/cargo.toml
[...]
[dependencies]
utils = { workspace = true }
[...]


#utils/Cargo.toml
[...]
[dependencies]
dotenv = { workspace = true }
thiserror = { workspace = true }
solana-program = { workspace = true }
[...]
Now that the dependencies are sorted, let’s proceed with parsing the environment.
utils/src/env/env.rs
use std::{env, fmt, fs, io};
use std::path::Path;
use std::sync::Arc;
use solana_program::native_token::lamports_to_sol;
use crate::env::errors::EnvErrors;

pub struct Env {
    websocket_endpoint: Arc<String>,
    rpc_endpoint: Arc<String>,
    private_key: Arc<String>,

    swap_amount: Arc<u64>,
    swap_priority_fee: Arc<u64>,
}

impl Env {
    pub fn new() -> Result<Self, EnvErrors> {
        // Test if .env exists or give the option to create one from .env.dist
        let path = Path::new(".env");
        if ! path.exists() {
            println!("Could not find .env, would you like to use .env.dist as a template instead? (y/n)");
            create_env().expect("Failed creating .env file");
        }
        dotenv::from_path(".env").ok();

        let websocket_endpoint = Arc::new(env::var("WEBSOCKET_ENDPOINT")?);
        let rpc_endpoint = Arc::new(env::var("RPC_ENDPOINT")?);
        let private_key = Arc::new(env::var("PRIVATE_KEYPAIR")?);

        let swap_amount = Arc::new(env::var("SWAP_AMOUNT")?.parse::<u64>().unwrap());
        let swap_priority_fee = Arc::new(env::var("SWAP_PRIORITY_FEE")?.parse::<u64>().unwrap());

        Ok(
            Self {
                websocket_endpoint,
                rpc_endpoint,
                private_key,
                swap_amount,
                swap_priority_fee,
            }
        )
    }
}

impl fmt::Display for Env {
    fn fmt(&self, f: &mut fmt::Formatter) -> fmt::Result {
        writeln!(f, "===================== ENVS Loaded =====================\r\n\
        websocket_endpoint: {:?}\r\n\
        rpc endpoint:       {:?}\r\n\
        private wallet:     {:?}\r\n\
        swap amount:        {:?} sol\r\n\
        swap_priority_fee:  {:?} sol\r\n\
        total per trade:    {:?} sol\r\n\
        =====================================================",
                 self.websocket_endpoint,
                 self.rpc_endpoint,
                 self.private_key,
                 lamports_to_sol(*self.swap_amount),
                 lamports_to_sol(*self.swap_priority_fee),
                 lamports_to_sol(*self.swap_amount.clone() + *self.swap_priority_fee.clone())
        )
    }
}

fn create_env() -> std::io::Result<()> {
    let source = ".env.dist";
    let destination = ".env";

    println!("Do you want to copy '{}' to '{}' (y/n)?", source, destination);

    let mut input = String::new();
    io::stdin().read_line(&mut input)?;

    // Trim input and check the response
    if input.trim().eq_ignore_ascii_case("y") {
        // Perform the copy
        fs::copy(source, destination)?;
        println!("File successfully copied to '{}'.", destination);
    } else {
        println!("Operation canceled.");
    }

    Ok(())
}
In the above, we define the Env struct with a ::new method. As a bonus, if you haven't created a .env file with the correct variables, you can use the version from the GitHub repo, and it will prompt you to create the file. Additionally, we implement Display for Env to print it in a controlled way using println!.
Note that we won't implement the correct data type for the private keypair until it's necessary.
utils/src/env/errors.rs
use std::env::VarError;
use thiserror::Error;

#[derive(Error, Debug)]
pub enum EnvErrors {
    #[error("Missing .env file")]
    MissingEnvFile,

    #[error("environment variable {0} set")]
    EnvVarNotFound(String, VarError),

    #[error("Invalid ENV {0} file")]
    InvalidEnv(#[from] VarError),
}
Here, we use thiserror to define the errors that may occur in Env::new, such as a missing file, missing environment variables, or invalid environment configurations.
Now, let’s give it a try.
sniper/srv/mains.rs
this should print out something that corresponds to the image below
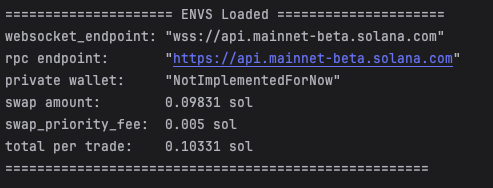
Output of the loaded env variables
Up next
In the next article, we’ll dive into Solana transactions, websockets, and RPC to listen for newly created tokens. Thanks for reading this tutorial! Don’t forget to subscribe so you won’t miss the next part of the series.